Installing onto a helmet.

Here is how to install the Prism using the Helmet Clamp mount onto a helmet:
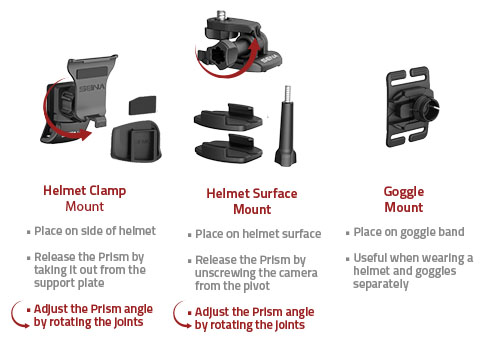
1. Attach the clamp kit to the side of the helmet.
2. Slide the screw plate onto the clamp kit.
3. Insert the ball joint of the support plate into the screw plate.
4. Attach the Prism to the support plate by tilting the top of the Prism and fitting the camera into the groove on the support plate then push bottom of the Prism towards the support plate until it snaps into place.
5. To release the Prism from the support plate, use your thumb to pull down on the bottom portion of the support plate and the Prism can be removed.
You can adjust the Prism for the desired viewing angle by loosening the screw plate then tightening the screw plate when finished.
The Helmet Surface Mount enables you to mount the camera on any surface of the helmet. You can adjust the camera angle by rotating the joints. When you are not using the camera, unscrew the camera from the pivot.
Here is how to install the Prism using the Helmet Surface Mount onto a helmet:
1. Place the Curved Helmet Surface Mount on the helmet like we have done so here on the top of this helmet.
2. Slide the Helmet Pivot Lock into the Curved Helmet Surface Mount.
3. Insert the pivot onto the Helmet Pivot Lock.
4. Insert the thumb screw to tighten the pivot.
5. Screw the Prism onto the pivot using the pivot screw.
You can adjust the Prism for the desired viewing angle by loosening the thumb screw on the Pivot Lock and/ or the pivot screw then tightening the thumbscrew screw and the pivot screw when finished.
The Google Mount enables you to mount the camera on the goggle band. This is useful when you wear a helmet and a goggle separately.
Here is how to install the Prism using the Goggle Mount onto a helmet:
1. Attach the Goggle Mount to the strap of the goggles.
2. Place the ball joint screw on the slide lock.
3. Insert the ball joint of the support plate into the slide lock.
4. Attach the Prism to the support plate by tilting the top of the Prism and fitting the camera into the groove on the support plate then push bottom of the Prism towards the support plate until it snaps into place.
5. To release the Prism from the support plate, use your thumb to pull down on the bottom portion of the support plate and the Prism can be removed.
You can adjust the Prism for the desired viewing angle by loosening the thumb screw on the Pivot Lock and/ or the pivot screw then tightening the thumbscrew screw and the pivot screw when finished.
Video:
Comments
0 comments
Article is closed for comments.